
Sending a postcard is a time-honored way to stay in touch with friends and loved ones any time you’re apart. Even today, when everyone is walking around with a smartphone in their pocket, postcards are still popular…and they’re even making a comeback amongst the younger generations. Some people see them as a novelty, a fun reminder of a simpler, slower way of communicating. Others simply find handwritten notes to be more personal and emotional than a simple text message. Regardless, this guide is all about how to address a postcard, and what you need to do to make sure your postcard arrives in your recipient’s mailbox without a hitch.
Table of Contents
- Write the Recipient’s Address Info on the Back of a Postcard
- Use the Designated Space for Addresses on the Right
- Include Any Notes on the Left Side of the Postcard
- Send a Postcard with a First-Class Mail Stamp
Write the Recipient’s Address Info on the Back of a Postcard
Every postcard contains a photo that takes up the entire front of it. Sometimes the photos are of beautiful landscapes; sometimes they’re of animals, and sometimes they’re of city skylines. Regardless, there isn’t any space to write anything on the front of a postcard, which means that any address info will need to be included on the back.
Addressing a postcard is no different from writing an address when sending a letter. Here’s an example of the format you’ll want to use:
- John Doe
- 12345 Main Street
- New York, NY
- 10014
Learn more about how to send a letter with a First-Class Mail stamp.
Use the Designated Space for Addresses on the Right
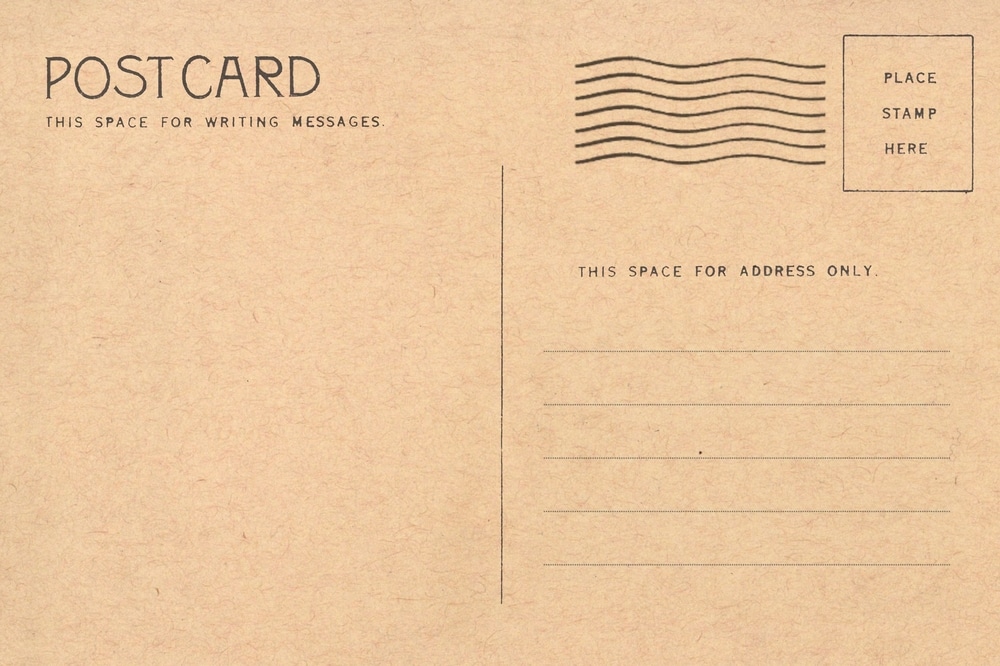
When looking for the right place to include your recipient’s name and address, look out for the horizontal lines on the right of the postcard. These lines are typically located underneath the rectangular box which indicates where to place your stamp. If you need help spotting these, just take a closer look at the main photograph at the top of this article! You’ll see five horizontal lines on the right-hand side.
Include Any Notes on the Left Side of the Postcard
Since the right side of a postcard is reserved for address information, the left side is where you can write a personalized note. This is the section where you can get creative and have fun! Tell someone that you’re thinking of them, or unleash your inner Shakespeare. The choice is yours.
Writing a personalized note isn’t required, of course. Still, it’s customary to write something for whomever you’re sending the postcard to. It would be a bit strange to send someone a postcard without a message to go along with it, don’t you think?
What if My Postcard Card is Horizontally Divided?
If your postcard is horizontally divided (meaning that it’s not divided into right or left sections, but a top and bottom), all of the same rules still apply. Simply write your recipient’s address on the designated address portion of the postcard. You can always spot the designated address area because it will contain printed lines that are meant for you to write your recipient’s info on. A postcard’s area for notes, on the other hand, will always be empty and won’t contain any lines.
Send a Postcard with a First-Class Mail Stamp
When you’ve addressed you’re postcard and you’re ready to send it, all you need is a First-Class Mail stamp and you’re good to go! You can pick up a roll of Forever stamps at your local Post Office, or you can order them online at USPS.com. As we said before. Once your stamp is affixed, you can send your postcard using any of the following options:
- Drop it in any of the blue USPS collection boxes you see around your town
- Place it in the “First-Class Mail” bin at your local Post Office
- Leave it in your mailbox for your local letter carrier to pick up (just don’t forget to lift up the flap that indicates there’s a piece of mail inside)


Be the first to comment!